Thursday, September 30, 2010

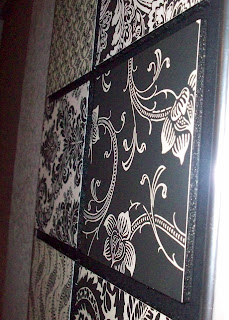
3-D Paper Crafted Wall Art

 This is a great idea to add color and panache to your home, and think about how easily it can be changed to coordinate with the holidays!
Great idea, simple to create, and budget friendly. Thanks goes to Kathryn for the inspiration!

There are a lot of ideas out there on how to use scrapbook paper in the decor of a room.  I love that you can get some beautiful 12" x 12" pieces of artwork {because let's be serious...some of those pages are closer to art than craft supplies}
for less than a dollar!  And you can buy the pre-made collections of paper and have them already perfectly coordinated for your color scheme and style.  Love it!

I found a lot of projects online with multiple pieces hung in a collection...but I wanted one final piece hung in a frame.  I found some good inspiration at some local stores {Hobby Lobby} and online...and here is what I made:


If you want to get the same look here are the steps I took
{sorry there aren't more pictures}:

Supplies you'll need:
-frame
-poster board (optional)
-foam core board
-paint (optional)
-scrapbook paper
-hot glue gun and glue stick

First, you'll need to decide how many panels you want and what size they will be.  My frame was 16" x 20", so I choose 6 panels that are 6" x 7".   Cut your paper and foam board to the same size and to the number of panels needed. 

Based on the color scheme of your papers, you might want to paint the edges of the foam board.  I wanted them to look like shadows, so I painted all the edges of my foam panels black.


Once the paint is dry, use the glue stick to attach the paper to the panels. 

I used black poster board as my background, so I cut it to 16" x 20" and put it in the frame.  You could also paint the cardboard that comes with the frame to get the right background color.


Now all you have to do is hot glue the panels onto the background and hang it up.  Super easy right?

Monday, September 27, 2010

Fast & Frugal tote bag


A great tutorial from Daisha
Here is an extremely easy Placemat Tote Bag Tutorial for you. This is such a cute, cheap, simple and frugal way to make a new bag to take with you to the kids soccer games, the park, or to church. The possibilities for colors and fabrics are endless.
Here's what you need:

- 2 Placemats
- 1 spool of ribbon
- Thread
- A few pins
- Sewing Machine
That's it. I got all my supplies at Walmart. The placemats where  $1 each and the ribbon $2.97 - only $5.00 for a new fun homemade bag!
Here's what you do:
1. Cut off a few inches ( I took off 3) from the length of your placemats.


2. Fold under 1/4 inch than another 1/4-1/2 inch so all those frayed ends are tucked inside. Then sew to hem and secure. This will be the top edge of your bag. (Make sure your thread matches your bag here.)


3. Cut your spool of ribbon in half. Lay the ribbon out from the bottom of the placemat up and around to make the handle for each mat. To ensure your ribbons are going to match up measure 3-3.5 inches from the outer edge on both sides. Pin the ribbon in place.

Once pinned lay the two placemats with right sides together and check to make sure that the ribbons line up correctly at the bottom, so once you  complete the project everything will be lined up and matching.
4.  Carefully sew the ribbon on to each placemat sewing very close to the edge on each side of the ribbon.

5. Put the placemats right sides together. Line up the bottom ribbons and pin the two sides and bottom. Sew the edges together  about 1/4 inch from the edge.


6. To square off the bottom you need to pull the sides of the bag away from each other. Then you will grab one corner and squish the bottom and side seams together until they line up. Just feel with your hand to make sure the seams line up and pin in place. (I hope that explains it well enough:) I used pics from another bag I made because they were easier to see. Let me know if you have questions.)
7.  Sew about 2 inches in from the "triangle tip". Repeat on the other side.
8. Turn your bag inside out and admire your work!! 

TA-DA!

Sunday, September 26, 2010

There's a pumpkin in my dryer!

Well, Aunt Peg has found a sister in hiding!
Allison from House of Hepworth is awesome!
Just read her bio page and you will know why we want to be a member of her family!
We stole this adorable pumpkin tutorial from her...

There’s a pumpkin in my dryer… oh, wait!
Now that Fall has officially arrived I remembered a cute craft my mom made years ago. DSCN5335
A dryer duct pumpkin!
I use to have one, but I can’t find it, so I just made another one. Now I get to show you a tutorial on how to do it. Yippie!
DSCN5341
These pumpkins are so fun and easy to make. And who would have thought to use a dryer duct?
For this project you’ll need:
* an aluminum dryer duct 3″ diameter about 21″ long
* 3 cinnamon sticks
* raffia
* hot glue gun or small stapler
* orange spray paint
First thing, aluminum duct.
DSCN5207
I purchased mine at a hardware store. This package was about $13, but just look at it!, it will probably make tons of pumpkins! Maybe you and your friends can go in together and split the cost.
DSCN5209
I wrapped the duct around into a circle to figure out how much I need. Make sure you cut a little extra. Better safe than sorry!
Since the duct spirals around, you’ll have to clip the wire in the duct.
DSCN5210
I tried to use scissors but they weren’t strong enough. I had to use pliers with a cutter on it to snip that one section.
DSCN5213
After the section was cut I measured it and it was about 21″ long.
DSCN5216
Either end of the duct will look pretty sloppy.
DSCN5220
So you’ll want to tuck the extra aluminum inside to make it smooth looking.
DSCN5219
Take either end of the tubing and bring them together and hot glue the edges together. Or if you have a small stapler you can probably just staple it together.
DSCN5222
Now it’s time to spray paint! I already had bright orange spray paint in my stash from my botched cooler project. I’m glad I finally found a use for this bright orange. I was afraid I had wasted four bucks.
DSCN5230
Once the paint was dry I just hot glued 3 cinnamon sticks in the middle and tied a raffia bow around it.
DSCN5332
I used 3 cinnamon sticks as opposed to one because the three together made a thicker stump which in my opinion looked better.
I also used about 5 strands of raffia to make a more full bow.
DSCN5333
On a side note, I bought the cinnamon sticks at Hobby Lobby. I originally found a package on the Fall isle for $3.99 but after browsing all the isles I found a package on the Christmas isle for only $1.99.
DSCN5203
Sneaky, Hobby Lobby. Very sneaky!
Maybe it will help my totally pathetic attempt at a computer desk seem more festive!
DSCN5321
Well, at least the mini dresser and pumpkin are cute!
DSCN5329
~ Happy Fall Crafting!! ~

Friday, September 24, 2010

Ceiling Fan Make-over This is just plain cool!

Jan at Bobbiepin's Boardwalk is just awesome.  Brilliance is her middle name!
Look at this tutorial-everybody has a nasty old ceiling fan they are wishing to get rid of...

Must we sacrifice comfort for beauty?
Is the more functional piece truly considered to be "undesirable"?
Must we sweat for the sake of design style?
Is the ceiling fan truly such an eyesore?

YES, YES, YES -- I admit it, but I refuse to give up my ceiling fans, especially this one with all the little stars stuck on the popcorn ceiling with the little soccer ball fan pull.  There must be something else -- another way!!!

Ahhhh -- Much Better.  Maybe I could tone down the pulls a bit, but I always have LOVED big and dangling hoop earrings! 
I have 9 ceiling fans in my home and patio and we use them. I admit, however, that some of them just aren't too terribly attractive, so it's time to start doing some updating without spending money on new fans or light fixtures.  Here is the process I used for the fan in the guest room.

1.  I spray-painted the edges and one flat side of the fan blades white (in the event the paper wasn't thick enough to hide the brown fan blades).  I also spray-painted the shiny brass ring that attaches to the light globe (This had previously fallen off.)  While these dried, I primed and painted the fan base which was still attached to the ceiling.  I used a sponge brush and Kilz primer, followed by a white trim paint.


2.  Here are the supplies you will need to cover your blades (and the popcorn is not an option).  The wrapping paper was purchased at Target.


3.   I  applied just a small amount of Gorilla Glue to reattach the ring around the globe.


4.  Lay your fan blade on the paper, being mindful of the pattern and where it will appear on the blade.  Mark with a pen and cut with scissors.  Repeat for each fan blade.


5.  Apply a generous amount of Mod Podge to the fan blade.

6.  Attach your paper, and then apply more Mod Podge.

7.  Rub your finger over the paper to remove all air bubbles and flatten any wrinkles that have appeared.  Repeat this for each fan blade.

8.  Allow the Mod Podge to dry and then reattach the fan blades and light globe to the fixture.

9.  Attach something unique for the fan pulls.  I consider this to be the jewelry of the fan.  Some ideas would be beautiful tassels, buttons, corks, shells, beads, chandelier crystals, etc.  I used porcelain ornaments, which I mod-podged in the same paper.  The pictures makes them appear large, but they really don't look that big; and I think they add to the uniqueness of the fan.  

Another type of paper to cover your blades would be a faux grass-cloth, using either wrapping paper or wall-paper.  You could also do some stenciling or hand-painting, perhaps monogram each blade.  
Join me as we take a stand to save our ceiling fans.  Do you have any other ideas that could be used to update ceiling fans?

thank you Jan!

Monday, September 20, 2010

Ribbon Flower Corsage

I want to thank Tami over at  
(don't you just love the name of her blog?).
A simple tutorial that creates a really elegant flower, and great on your budget to boot!
And if the tutorial isn't perfect enough, Tami has divine recipes on her blog too! Check her out!

This is a super easy flower corsage that I made with ribbon that you can attach to just about anything.  You could sew it on to something or use a pin clasp (or in my case just a safety pin since I ran out of pin clasps.)  All you need is some ribbon and some hot glue!  
Excuse my rotary mat...my son decided that it needed his artistic touch a few years ago.

First cut 12 strips at 2 1/2 inches long and dab small bits of hot glue at the end of your ribbon and fold each corner over a bit.  Put a dab of glue in the center at the top and fold the top over.  Do the same for all 12 petals.
Once you have them all done cut out a small felt circle and start placing them on there with small dabs of hot glue.  I folded the ribbon back on each side too create a pleat or so (see below.)   Glue 6 of the petals on.  Now for the next layer of petals just start gluing them on in the same manner as the first layer but overlaying in between the first layer.   
For the center of the flower just take a strip of ribbon and folded it half.  Run a loose running stitch on the edge of the folded ribbon and gathered it up.  Next start rolling it up to form a bud or small flower in the center and use a needle and thread to stitch the bottom of it to secure it.  Its hard to see in the picture because of the black ribbon.  After you have made your center just apply it to the center of the petals with some hot glue and your flower corsage is ready!
 Here is the finished flower...I attached it to my purse that I made
You could also pin it to a sweater...
You could also attach it to a necklace!  I just ran the small safety pin through the chains and connected them.

ENJOY!
I just keep thinking about the endless possibilities! The colors, the uses, the sizes, the glamor, the envy of my friends...