Showing posts with label Helpful Tips. Show all posts

Monday, September 19, 2011

Hanging frames with ease

About 18 months ago I moved to a new home. I hate moving. I hate unpacking, so I admit that I still have stuff in boxes and things waiting to be hung, but I have made it my personal mission to get caught up on this stuff by the end of the month.
With that said, I have got to complain about hanging photos, wreaths, and anything else requiring a nail in the wall.  I hate, loathe, detest, and despise it!  but as much as I hate it, my husband hates it even more and refuses to do any hanging so I am stuck doing it on my own (hence the reason I still have stuff waiting...).
The other day while killing hours (literally hours) checking out great stuff on Pinterest, I ran across something so brilliant that I almost gasped.  Then I thought "why didn't I think of that?"
I want to share with you the outstanding idea Michelle from The Scrap Shoppe posted.
Her simple yet brilliant idea allowed her to hang this awesome collage with ease!

 I know, right?
Here is the link to her quick and easy tutorial so that you can feel that ah ha moment too!
(don't forget to check out the rest of this blog too-Michelle has such great things)
Photobucket

Wednesday, January 5, 2011

The forgotten Gift Idea

Even though the holidays have just ended and you have given a gift to possibly every person in your state (or so it may seem to you), I have a great idea to help you be prepared for those little surprise moments when you need a quick gift to give.  There is always the forgotten birthday, the unexpected drop in, a housewarming party, that father/mothers day and who knows what all, so I keep several of these little gifts in my pantry as a fast go-to when I am caught unprepared (happens more than I will admit).  This is very simple and just by giving this basic idea some additional thought, I know that our readers will come up with even better idea's (remember to share them with me, I always need help)!

I purchase several cans of premixed salsa seasoning, and then divide some of the cans up into 1/2 pint or 1 pint jars.  Add a little ribbon, a few embellishments and a simple tag with instructions, and that completes the project!
Easy, Peesey!


(I purchase the H and H brand 30-second salsa mix because it is the one my family likes the most, and this is in no way a solicited endorsement.  Just some info about the item I like.)
HnH Brands Seasoning
We're linking up with:
Photobucket

The Blackberry Vine

Tuesday, December 14, 2010

Printing Vintage Images Tutorial

This is a brilliant tutorial!
I love how simple it is, and you will be SOOOOOO inspired by this idea! 
Vicki at the Rusty Rooster Vintage has a lot of fantastic idea's, tips, tutes, and more...but this one I fell in love with...


Tutorial - Your printer is not just for copy paper.

I'll try anything once...well at least when it comes to our printer!  I've run a long list of items through the printer with much success and a few scary "paper" jams.  The best items I've found to use are: cardstock, recycled paper bags, lightweight and flexible cardboard (like a recycled snack box), fabric, used dryer sheets and printed vintage pages (like dictionary or sheet music).  The results are one of a kind.  Let's get started!
FOLLOW THE LINK TO GET THE ENTIRE TUTORIAL, AND YOU WILL SPEND THE REST OF YOUR DAY MAKING THINGS!  TOO, TOO FUN!
Thanks Vicki!

Monday, October 11, 2010

Flower Pom Pom's

We love Ashley at Little Miss Momma, she is so talented and creative. We wait for her posts to go up so that we can get great inspirations! We featured one of her posts recently, and just NEED to post this one too! You will definitely be hearing more about Ashley from us-she shines in out in blog land!

Scrunch Fabric Flower Pom Pom Headband Tutorial


Ready to learn how to make your very own Flower Pom headband?!

Here's what you'll need:
About 20-30 circles cut out of the fabric of your choice {about 1.5 inch circles}
Elastic Headband {purchased at Target}
Hot glue and glue gun
Scissors
Felt
Let's get started!
Cut out one felt circle in the size you want your pom pom to be.
Take one of your fabric circles and scrunch from the middle.


Add glue to the end of the scrunched portion.

Place glue-side down on the center of the felt circle.

Continue to add the scrunched fabric circles around the center one.

...and add some more.

and some more...

and more...

Until voila! You have a full and fluffy pom pom!

Now flip over your pom and grab your elastic headband.

And glue your headband to the center of the pom.

Then apply the second felt circle on top of the headband to cover the band.

And now you have a fun pom headband!


Friday, September 24, 2010

Ceiling Fan Make-over This is just plain cool!

Jan at Bobbiepin's Boardwalk is just awesome.  Brilliance is her middle name!
Look at this tutorial-everybody has a nasty old ceiling fan they are wishing to get rid of...

Must we sacrifice comfort for beauty?
Is the more functional piece truly considered to be "undesirable"?
Must we sweat for the sake of design style?
Is the ceiling fan truly such an eyesore?

YES, YES, YES -- I admit it, but I refuse to give up my ceiling fans, especially this one with all the little stars stuck on the popcorn ceiling with the little soccer ball fan pull.  There must be something else -- another way!!!

Ahhhh -- Much Better.  Maybe I could tone down the pulls a bit, but I always have LOVED big and dangling hoop earrings! 
I have 9 ceiling fans in my home and patio and we use them. I admit, however, that some of them just aren't too terribly attractive, so it's time to start doing some updating without spending money on new fans or light fixtures.  Here is the process I used for the fan in the guest room.

1.  I spray-painted the edges and one flat side of the fan blades white (in the event the paper wasn't thick enough to hide the brown fan blades).  I also spray-painted the shiny brass ring that attaches to the light globe (This had previously fallen off.)  While these dried, I primed and painted the fan base which was still attached to the ceiling.  I used a sponge brush and Kilz primer, followed by a white trim paint.


2.  Here are the supplies you will need to cover your blades (and the popcorn is not an option).  The wrapping paper was purchased at Target.


3.   I  applied just a small amount of Gorilla Glue to reattach the ring around the globe.


4.  Lay your fan blade on the paper, being mindful of the pattern and where it will appear on the blade.  Mark with a pen and cut with scissors.  Repeat for each fan blade.


5.  Apply a generous amount of Mod Podge to the fan blade.

6.  Attach your paper, and then apply more Mod Podge.

7.  Rub your finger over the paper to remove all air bubbles and flatten any wrinkles that have appeared.  Repeat this for each fan blade.

8.  Allow the Mod Podge to dry and then reattach the fan blades and light globe to the fixture.

9.  Attach something unique for the fan pulls.  I consider this to be the jewelry of the fan.  Some ideas would be beautiful tassels, buttons, corks, shells, beads, chandelier crystals, etc.  I used porcelain ornaments, which I mod-podged in the same paper.  The pictures makes them appear large, but they really don't look that big; and I think they add to the uniqueness of the fan.  

Another type of paper to cover your blades would be a faux grass-cloth, using either wrapping paper or wall-paper.  You could also do some stenciling or hand-painting, perhaps monogram each blade.  
Join me as we take a stand to save our ceiling fans.  Do you have any other ideas that could be used to update ceiling fans?

thank you Jan!

Saturday, September 11, 2010

Quick Easy how-to for hanging pictures-simply brilliant!

I must say that I think I have found the best helpful hint of the century so far!  I just keep wondering why I didn't know this before I started hanging things on the walls of my new home...I know you will find this helpful too, so we GRATEFULLY thank  Rachelle over at Adventures in Creating!


Quick and Easy Way to Hang Pictures

I was hanging some pictures in Con-Man's room and thought it might be a good technique to share. I learned this back in the day when I worked at the furniture store. We changed up the displays often; so we needed a quick way to hang the pictures that went with the furniture.


Do you hate those picture frames that have the 2 hooks on each end for the nails? I do, I never have picture wire and if I didn't know about this way to hang pictures, mine would come out crooked every time. So, try this next time instead:


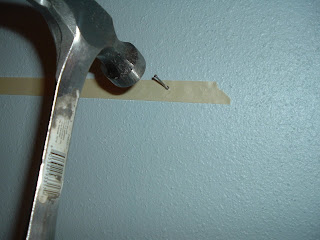
Lay the picture you are hanging face down. Take some masking tape or painters tape (anything that is not very tacky so it won't peel the paint off the wall) and lay it over the hooks where the nails will go. Then use a pen to mark where the hooks are.


Close up shot of pen mark. Make the mark at the very upper point of the hook. Most are a triangle shape, you will want your nail to go at the most upper point.


Next peel the tape off the picture frame and tape it on the wall at the height you want your picture to hang. Use a level to make sure it is straight. 


Now just hammer 2 nails in at the points you marked on the tape. After you are finished peel the tape off the wall. You are left with 2 nails in the perfect position on which to hang your picture.


See, quick and easy!
 AMAZING!

Friday, September 3, 2010

HALLOWEEN DECOR IDEA'S-oh my gosh!

What an amazing post we found!  I want to make everything here!
Be sure to follow the links I've attached because other blogs are also posting unbelievably great stuff!

Visit the links to see full posts for these fall-lovin' bloggers:
Debbie Doos shares her fall decorating from last year to get you inspired...
 Ideas to embellish you pumpkins at Embellished Bayou...
 
And here are some of my projects from last year... 
Faux mercury glass pumpkins:
Dress up a candle:
Decoupage Letters & funkin:
House # pumpkins with glow in the dark numbers:
Nevermore Tree:

Powder room vignette:
Patio last autumn, decorating with free and natural outdoor treasures:
The dining room is undergoing a transformation at the moment but here it was last year...

Decorating the grape arbor: