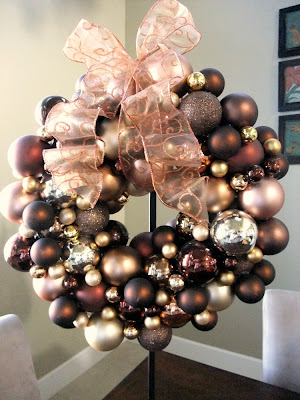
This wreath is beautiful~if I do say so myself.
I made this wreath 2 years ago, but I really want to showcase how gorgeous it is, how well it has stored and how really simple it is to make!
The list of supplies you need:
1 white Styrofoam wreath form
(mine is an 18" wreath)
Glue gun and lots of glue
Muslin or other neutral color fabric, cut into 2" strips
(enough fabric to be wrapped around the form-I am not sure how much I used, but it's not a ton, maybe a quarter yard...)
Christmas ornaments in assorted sizes and colors-whatever combination you like
(there are 3 dozen tiny ornaments, 2-3 doz. combined medium and large ornaments, and about 18-24 small ornaments in my wreath)
Decorative ribbon, at least 4 yards
(more if you want your ribbon larger)
Simply start by wrapping your styro form with the strips of cloth. I used a couple of heavy pins to secure the fabric at the beginning. Wrap tightly all the way around, and secure the end piece with either glue or more pins.
Lay your wrapped wreath form flat on a table or counter to work with. You will want to keep it flat down as you work around the edges gluing the ornaments. This way the back of your wreath will be flat and hang nicely against a wall.
Now, starting on the inside of the wreath, simply glue large and medium balls to the wreath. ALWAYS TRY TO MAKE 2 OR 3 POINTS OF CONTACT WITH THE GLUE AND EACH ORNAMENT. By this I mean, use plenty of glue to secure the 1st ornament to the form, then the next ornament will be glued to the form and also to the ornament next to it... Always remove the metal caps on the ornaments before gluing...I have learned that the ornament make come out of the cap, and fall and break, while the cap stays nicely glued in place-ugh!
Now glue more ornaments on the outer edge of the wreath, all the way around.
Start back at the center of the wreath, and simply start gluing the ornaments around the form. Use the tiny and smaller ornaments to fill in the gaps. My wreath actually has 4 different sizes of ornament balls I used a lot of medium and small ones, with the tiny size filling in the little holes. I bought most of them at the discount store's and at Hobby Lobby. I looked for plastic ones, and there are lots of those in the wreath to help control breakage, and to lighten the weight. However, I love the look of the very shiny reflective balls too (as you can see in the photo's that my image keeps appearing in the reflections-ha ha) so I used lots of glass one's as well.
Let the wreath stand for a while to make sure the glue is really set and has had time to cool all the way around. Now carefully pick up your wreath and watch for loose area's. Re secure any of the wobbly ornaments, and then you are ready to attach the bow!
I simply wrapped a piece of ribbon around the wreath, and then tied my ribbon to the strip.
I used a pipe cleaner to wrap around the form (not the ornaments) just by wiggling in through the maze of balls, twist tied it securely together and I have a hook to hang it with!
The mantle and fireplace in my home are really high. I mean I need a ladder to put things on the mantel, so the pictures look kind of distorted. I was too lazy to get my ladder back out and climb up to take better pictures...sorry!
I hope you will try this wreath, it just makes such a beautiful piece in a room!
I am thinking about making a pink, white, and red one for Valentines, with some of the adorable blown glass heart ornaments that are available right now at Christmas.
I would love to see pictures of any wreaths that you make, so drop us a line or note if you do this project!
Best wishes, and happy Fall, Ya' All!
We love linking up with:


AND WE ARE SOOOO FLATTERED! This post was featured on:


