Monday, October 3, 2011

Witchy Halloween Wreath

Have you all heard of Pinterest?  I am obsessed, I spend waaaaay too much time browsing the Pinterest sites, but heavens, the inspiration I find! 
A couple of weeks ago, I found the most awesome, fabulous, creative, divine and gorgeous wreath I have ever seen, so I immediately pinned it to my "Wreath" board and began to obsess over it. It turns out this wreath I coveted, was for sale in this store: http://petalsnplumes.etsy.com. She has absolutely gorgeous stuff!
I couldn't really afford the well earned price of her wreath, so I decided to make one similar, but a bit more within my budget.

HERE IT IS:
I know, right?
This is by far, my own favorite crafty project for this year. I love all things witchy, and this one totally feeds my love.


I started with just your basic grapevine wreath (24"), from Hobby Lobby for $6.00-but I used my 40% off coupon, making the wreath $3.60.


I purchased the glittered pumpkins, black crows, and all of the fall leaves from my local Dollar Tree store, total cost there: $11.00. The flowers I used were actually from an old centerpiece I had, and was planning to discard so those cost me...NOTHING!


I bought 3 boxes of Christmas ornaments (yep-xmas ones), also from Hobby Lobby. Glitter black, purple, and orange. There were 6 ornaments in each box, and I split those (and the cost) with a friend of mine who also made this wreath. Each box was $3.60 on sale ($10.20 total, divided by 2= $5.10).


These awesome fabric painted witch legs I purchased on Ebay, for $13.00, shipping included (this was item that I received a bit of a discount on because I bought multiple's-they are normally about $18.00 with shipping).  My girlfriends' legs have orange stripes.


I purchased this hat in the Halloween costumes at Target ($3.00), and then I clipped the wire in the hat brim, pulled it out and replaced it with lighter weight craft wire that I could bend easily. I stuffed the hat with black tissue paper, and then folded the back of the brim underneath, to keep the tissue paper in place, and stapled  it to the front side of the brim.
.
 
The boa came from Hobby Lobby (obviously I love this store), and was split between 3 wreaths. Cost of the boa was $6.99 (not on sale dang it). Dividing by 3 (another friend used some) makes it $2.33 for me.
Lastly, the ribbon and tulle were all items I already had, so I can't really give an accurate cost for them, but I used approx 4 yards in the bow for the hat, and maybe 2-3 yards total for the loops and streamers throughout the wreath. Tulle measurements were about 18" for each one I gave them a bit of a "ruffled" look by folding and stapling them a bit before gluing them down.
I convinced my friend Joy to give me 2 of her spiders, so those were free for me! Really she is so kind and wonderful and giving that she offered these to me (I'm buttering her up for future projects), so no large pleading scenes were needed.
I used about 5 hot glue sticks and some additional crafting wire for securing the pieces.

My walls are not purple or pink but a taupe color-bad lighting-lol
 

This was definitely not my best photo taking day, but the natural light was cloudy, but I know you can see the idea. I hope you like this wreath as much as I do, and that it inspires you to make something wonderful for the Halloween season.

Total $$$ spent by me for this wreath: $38.03 
(plus our sales tax). 
GREAT PRICE, I SAY!
Photobucket

Monday, September 19, 2011

Hanging frames with ease

About 18 months ago I moved to a new home. I hate moving. I hate unpacking, so I admit that I still have stuff in boxes and things waiting to be hung, but I have made it my personal mission to get caught up on this stuff by the end of the month.
With that said, I have got to complain about hanging photos, wreaths, and anything else requiring a nail in the wall.  I hate, loathe, detest, and despise it!  but as much as I hate it, my husband hates it even more and refuses to do any hanging so I am stuck doing it on my own (hence the reason I still have stuff waiting...).
The other day while killing hours (literally hours) checking out great stuff on Pinterest, I ran across something so brilliant that I almost gasped.  Then I thought "why didn't I think of that?"
I want to share with you the outstanding idea Michelle from The Scrap Shoppe posted.
Her simple yet brilliant idea allowed her to hang this awesome collage with ease!

 I know, right?
Here is the link to her quick and easy tutorial so that you can feel that ah ha moment too!
(don't forget to check out the rest of this blog too-Michelle has such great things)
Photobucket

Monday, August 1, 2011

All about the shoes

Wait until you see the tutorial I stumbled across several months ago...Paper shoes!
These are beyond adorable!
Lori at Paisley Passions, (a HUGELY popular blog, and one I adore) created these shoes back in September of 2010, but the tutorial is so popular that I still see links out and about.
I really wanted to give you wonderful followers the link too, because there are soooo many fun things you can do with these!
Think Halloween witch shoes, bridal shoes, girls night out shoes, bunco gatherings, Christmas, New Years, Mothers Day, Easter, St.Patricks...see what I mean?
Lori has kindly provided the template so that you can get to work using your imagination to create an entire "wardrobe" of party favors!
Have fun!


Lori's own quote about her awesome shoe design: "Aren't they DARLING???????? I just LOVE them! They look super cute when they are stuffed with some "goodies" as a party favor."
And I agree with her completely!  THANK YOU LORI!

Tuesday, June 14, 2011

~Chocolate Emergency Kit~

I first got the idea for my Chocolate Emergency Kit when I saw the adorable chocolate emergency valentine craft on Making Memories With Your Kids blog.  This blog has truly fun, creative and cute crafts and food recipes~ you should stop by and browse there!
My little emergency kit is very simple and quick to make. Although I would love to have a done something more elaborate with far more creative and beautiful embellishments, my time and talent just doesn't allow...I have no talent for matching colors and figuring out super cute embellished designs.  This is why my little gift is super fast and easy! 
 Here is a list of supplies you will need;
~1 can Hershey's Chocolate Syrup
~1- 8 1/2" x 11" or 12" x 12" patterned scrapbook paper
~Double sided tape or double sided tacky strip
~16" of  ribbon
~8" of ribbon in a different color
~Small pieces of scrap paper in colors that 
coordinate with your patterned paper
~A plastic spoon
~A small strip of paper with the words 
"In case of emergency... pop top!" printed or written on it.
~Paper trimmer
~Scissors
Using your paper trimmer, cut a 3 1/2" x 10" strip of paper from your patterned paper.

Place a piece of your double sided tape or tacky strip on each end of the paper strip.
Attach one end of the paper to the can (I lined my paper up with the labels own seem so that my paper would be straight).  Simply roll the paper around the can and seal down.


I made 3 of these "kits" for some girlfriends so I used a slightly different paper for each one, and chose different color ribbon for each one.  My color choices were a bit lame, but I ran with what I had on hand.
From here it's simply a no-brainer.  Make your tag by gluing layers of coordinating paper together, and punching a hole on one end for the ribbon to slip through.
Tie the larger piece of ribbon around the can in a half knot. place the handle of the spoon over the crossed ribbon and then tie the ribbon over the spoon in a simple knot (not a bow ).  Trim ends to your desired length.
Slip the smaller piece of ribbon under the knot of the larger ribbon, attach the tag, then tie into a bow. Trim ends and your finished!


This is so simple I feel foolish writing this post up as a tutorial!  Anyway, I hope this gives you some inspiration to improve on...HAVE FUN!

Friday, June 3, 2011

Paper Beads!

I saw the cutest tutorial yesterday, and the more I thought about it, the more I wanted to share it with you guys. This craft tutorial is from Anni, a young girl who has created the beads, and she gives you simple step by step instructions.  Your gonna love her.
While you are over at 36th Avenue, check out the other fun crafts and stupendeous idea's...more brilliance! 
MAKE YOUR OWN BEADS...OUT OF PAPER!
This is such a fun and simple craft idea.  A wonderful project for your kids during the summer, when they run to you and say those evil words: "I'm bored!".
And I bet anything you will want to make some for yourself
(oh and this project is also VERY inexpensive to make-you can't lose)!
The 36th Avenue blog has the complete tutorial and some great tips, so jump right on over there and get the complete how-to's!

Tuesday, May 10, 2011

How to tell if your from Utah

I love living in Utah.  I loved raising my children here.  It is a spectacular place with mountains to ski in, lakes to boat and swim it, the amazing Great Salt Lake, the Bonneville Salt Flats, Arches National Park, Zions National Park, a rich history of pioneer endurance and settlement, Park City Resort (my mom Sally was raised there), the Sundance Film Festival, home of the 2002 Winter Olympics, beautiful deserts, the Shakespearean Festival, world renowned Universities and hospitals,  wonderful people, and soooo much more.
This is also a place of funny quirks and idiosyncracies (sp?), and Jeff Foxworthy has pointed out some hilarious insights about us "Utahns".  If you live here, have lived here, vacationed here, driven through here, or possibly even flown over Utah, you will most definitely understand and laugh about the following... 


Jeff Foxworthy explains Utahns!
If someone in a Home Depot store offers you assistance and they don't work there, you live in Utah.

If you've worn shorts and a parka at the same time, you live in Utah

If you've had a lengthy telephone conversation with someone who dialed the wrong number, you live in Utah.

If 'vacation' means going anywhere south of Salt Lake City for the weekend, you live in Utah.

If you measure distance in hours, you live in Utah.

If you know several people who have hit a deer more than once, you live in Utah.

If you have switched from 'heat' to 'A/C' and back again in the same day, you live in Utah.

If you install security lights on your house and garage but leave both unlocked, you live in Utah.

If you can drive 75 mph through 2 feet of snow during a raging blizzard without flinching, you live in Utah.

If you design your kid's Halloween costume to fit over a snowsuit, you live in Utah.

If the speed limit on the highway is 75 mph -- you're going 80, and everyone is still passing you, you live in Utah.

If driving is better in the winter because the potholes are filled with snow, you live in Utah.

If you know all 4 seasons: almost winter, winter, still winter, and road construction, you live in Utah.

If you find 10 degrees 'a little chilly' you live in Utah.

If you actually understand these jokes and forward them to all your friends, you live in Utah.

                                                        Photobucket

Monday, April 18, 2011

Easter Printable-The Greatest Man

This is a simple, printable 8 x 10 image that carries a
wonderful statement.
A truly perfect print for Easter or for the whole year through.
I hope you love this message as much as I do!
Click on the image, then right click and save to your computer.
HAVE A BLESSED EASTER!
Photobucket

Thursday, March 17, 2011

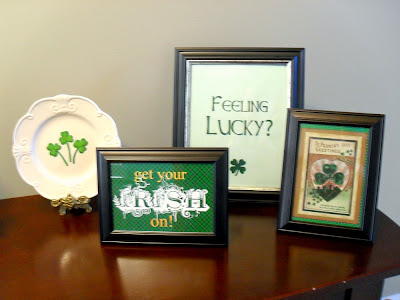
An ode to St. Patrick's Day!

This is my little nod to the fun St. Patrick's Day celebrations!
Besides having a divine dinner of Corned Beef, cabbage, steamed potatoes, green bread and Irish Cream brownies, we love to sport just a little green around our house!  And here's a little Irish wish for you and yours:


May your troubles be less,

And your blessings be more.
And nothing but happiness,
Come through your door.


HAPPY ST. PATRICK'S DAY!
Photobucket

Thursday, March 3, 2011

Lucky Leprechaun

Here is a quick post about my St. Patrick's Day craft...


It's short and sweet because I also did the same craft for Valentine's day 'You've Framed My Heart' bwaaahaaa!
I don't really have a name for this one... Leprechaun Squared?   Boxed Lucky Charm?  Touch O' the Irish?
(Geez, maybe I need a nap...)


2 little wood shamrocks painted and glittered-it's like kindergarten!

Truly this ribbon matches, I don't know why the color didn't photograph well...

This guy reminds me of my little brother Shaun, who was born on March 17th, has red hair and green eyes
 and is always into trouble!  TRUE STORY!


Sorry about the blurry image, lets just chalk it up to Leprechaun mischief!

Well, this is my March craft project.  Sad but true.  I do have a couple of things I want to make when I have those sleepless nights, but then sleeping pills help eliminate those moments-ha ha ha!
Photobucket

Wednesday, February 9, 2011

Job Survival Kit

Our business venture Aunt Peg's Jewelry has created a new sister company called Joyful Creations!
We have partnered with 3 amazing women to begin this exciting chapter in our lives.
These 3 women, Joy, Ludean and Linda are currently working together in a professional capacity, but the goal for Joyful Creations is to grow large enough for them to leave their positions and focus on jewelry full time.
JOY, LINDA, & LUDEAN-wicked crazy, and so much fun!
Their excitement and enthusiasm for this project is making it so hard to stay focused in their current jobs that I decided to make them a small "JOB SURVIVAL KIT" to add a bit of humor and encouragement for the upcoming months...
I thought I would show you what I made for this...

I love this quote. Each time they might look at it I'm hoping to help them remember to keep their eyes on the horizon, for our goals are attainable, with some patience and a lot of hard work. 

A girl always needs some water to refresh herself, and the cute terra cotta coasters I made has a fabulous image of 3 old ladies "pole dancing"!


These are hand sanitizer bottles, with a fabulous insert that you personalize yourself. Here is the link to this great tutorial!  The Idea Room


Everyone needs a snack. Every day. Maybe all the time...
Best mustard dip you will ever find!
You can find the recipe here:  Sweet Mustard Dip/Sauce


Keeping your hands clean after snacking requires funny napkins!


A small way to cope instead of snap when your crazy supervisor stops by with some inane remark...lol


I made a fun calendar stand that I personalized  just for them with some inside joke images to keep them smiling...they loved them!
Here is the link to the awesome tutorial and free download calendar pages from Very Merry Vintage.

Well these are the items I gathered together for my friends...I hope it's working! 

Photobucket