Monday, October 11, 2010

Shabby Chic Halloween Pumpkins

I have seen many projects similar to the one's I made here, 
but I am thinking these may be rather unique...

  • scissors
  • tissue wrapping paper
  • assorted ribbons
  • Mod Podge
  • sponge paint brush
  • white primer spray paint
  • Sharpie markers
I purchased a few pumpkins from the Dollar Tree Store, and spray painted them with white primer.
Next, I measured from the base of the stem down to the bottom middle of the pumpkin (in this case the measurement was about 8 inches).
  I purchased this white and black tissue wrapping paper at Hobby Lobby. I took 2 sheets of the paper, laying 1 on top of the other, then folded them into fourths.
I cut 8" rectangle's through all the layers of papers, so that it gave me about 20-22 pieces of tissue paper. I then rounded off 1 end slightly so that the top had an oval shaped edge..
Starting at the top of the pumpkin, I painted a 3" line of Mod Podge down the pumpkin to the center of the bottom, and taking the a piece of the tissue paper, I placed the short, flat shaped end up against the base of stem and smoothed the paper down over the pumpkin until it adhered well. I used additional Mod Podge to make sure that all the edges stuck down tight. I carefully pressed the surfaces to make sure it was well stuck down and and the small wrinkles were smoothed out.  I repeated these steps again, this time using the oval cut end of the paper up next to the stem, and overlapping the 2nd piece of tissue slightly over the 1st piece of tissue.  Continue on around the pumpkin, staggering the flat end with the oval shaped end around the stem, until the pumpkin is completely covered with the tissue strips. Then working carefully completely coat the outside of the pumpkin/tissue with more Mod Podge until ALL of the tissue paper has received a layer.  Don't over coat with the glue however, because the thicker the coat, the more the pattern in the paper will become foggy in appearance.  Let this all dry-usually 3-4 hours in an airy place.
 Next, using a Sharpie Marker (in my case I used silver), simply color the stem of the pumpkin so that it is completely 1 color (if you are using real pumpkins, it is easiest to just spray the stem with the primer and leave it white). Cut your strips of ribbon to desired length (I used a 6" measurement), stack them, and use 1 additional piece of ribbon to tie them all together in the center. Glue the ribbon cluster onto the top of the pumpkin, and the project is complete!
I think this pumpkin is my personal favorite.
 
 However, I did not use tissue paper for this pumpkin, (and after working on this one I realized I would not have had to paint it first either) I purchased lunch size treat bags for the party section of Hobby Lobby and simply cut them to the same measurements as the tissue paper! These have a gorgeous glossy black and silver foil pattern that I just love!
~You use the exact same steps with the sack paper as you do the tissue paper~

 
What do you think? I'm lovin em!

Monday, October 4, 2010

Milk Carton Tutorial

I love paper crafting, but I am the first to admit it is not my strong point in the creative world. However this post is something I'm proud of, because I actually made these! LOL
I participate in a 'Stampin' Up' class one night every other month, and my instructor Barb Jepsen is a paper crafting rock star! She taught us the awesome craft at the last class...
Here is a list of the items you will need:
  • 1 8 1/2"x11" Transparency sheet
  • Paper slicer/scorer
  • Scissors
  • Adhesive
  • 1- 8 1/2"x11" sheet color paper
  • 1- 4x6" white paper (or scrap)
  • 1- 9" piece of ribbon (or longer if you want to tie a nice bow)
  • 1- 5" piece of ribbon for the card
  • stamp & ink
  • 2 flowers, rhinestones, or any embellishments you want
  • 1 mini paper clip
  • Candy (my favorite part)
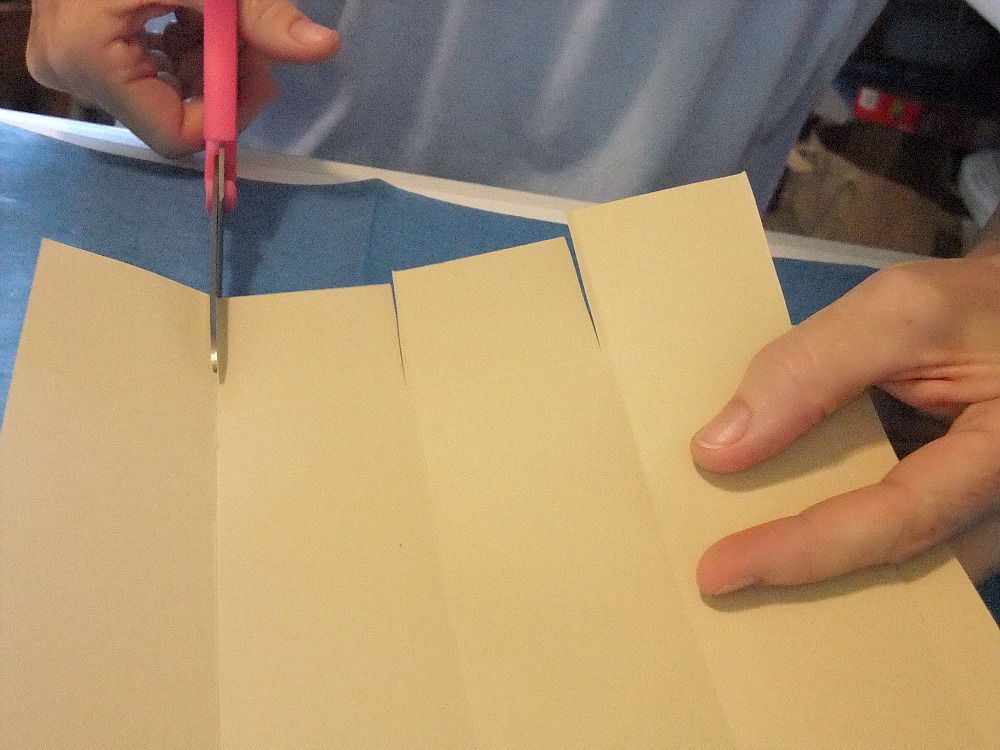
The transparency sheet was so hard to photo, I used a tan piece of paper strictly for the photo's-just pretend I'm using the transparency for the first 1/2 of this tute.
With the 8 1/2  side of the paper at the top, score a line downward every 2 inches (3 score lines).
 Then turn the paper cross wise and score another line 2" from the top.
Now below the 2" cross wise score line. snip the small 1/4" piece off. Now cut at the score lines from the bottom up to the cross wise score mark.
 
 Using a bone folder or Popsicle stick, crease the score lines tight.
Now we can start assembling the cute carton.
Run a continuous adhesive strip down the 1/4" side (make sure the score folds are facing up-toward you).
Use a very good adhesive or tacky strip on the transparency to hold the box together.
Fold paper together to form the box, lining up the 1/4" score mark with the opposite edge of the paper, press securely.
 
Now for the bottom: fold in one side, the fold in the opposite side, turn and do with the remaining 2 sides. On the last side, put lots of adhesive on the side that will rest again the other paper, and press down securely. If the bottom of the box is not tightly secure add a bit of adhesive where ever you feel it need to be.


Now onto the embellishments!
From your color piece of paper cut a strip that measures 8 1/2" x 2". If you want to, trim one of the 8 1/2" sides with a decorate cut.
Score this piece of paper every 2" along the 8 1/2" piece. Lightly fold at the score marks.
Secure it to the base of the carton with adhesive (you can place it anywhere you want to, I made 1 with the paper lined up with the bottom, and 1 set at a slightly higher place).
(I like to tuck the 1/4" folded piece behind the paper so that my seam ends on the edge of the box)


Next secure your piece of ribbon around the paper. You can place this anywhere you want. Trim the end so that there is only a slight overlap of ribbon.
For the card:
Cut your small piece of white paper to a 4" x 2" piece. Fold in half. Simply glue the remaining 5" ribbon piece around the front of the card, trimming ends for just a slight overlap again.

Using your embellishments finish off the front of the card and box in your desired style.
Fill your box with the candy you have chosen (I used Almond Joy Pieces), pinch the top of the box closed, forcing the sides inward, and secure the card to the top with a mini paper clip (I bought a box of 25 at my local Office Max for about $5.00).


TA DA!
It's finished!
I'm not sure how helpful this tutorial will actually be for you, my instructions probably don't make a great deal of sense, but the pictures should help!
I would love to see pictures of any that you create, so stop back and post a link or two!

We're linking up with:


Thursday, September 30, 2010

3-D Paper Crafted Wall Art

 This is a great idea to add color and panache to your home, and think about how easily it can be changed to coordinate with the holidays!
Great idea, simple to create, and budget friendly. Thanks goes to Kathryn for the inspiration!

There are a lot of ideas out there on how to use scrapbook paper in the decor of a room.  I love that you can get some beautiful 12" x 12" pieces of artwork {because let's be serious...some of those pages are closer to art than craft supplies}
for less than a dollar!  And you can buy the pre-made collections of paper and have them already perfectly coordinated for your color scheme and style.  Love it!

I found a lot of projects online with multiple pieces hung in a collection...but I wanted one final piece hung in a frame.  I found some good inspiration at some local stores {Hobby Lobby} and online...and here is what I made:


If you want to get the same look here are the steps I took
{sorry there aren't more pictures}:

Supplies you'll need:
-frame
-poster board (optional)
-foam core board
-paint (optional)
-scrapbook paper
-hot glue gun and glue stick

First, you'll need to decide how many panels you want and what size they will be.  My frame was 16" x 20", so I choose 6 panels that are 6" x 7".   Cut your paper and foam board to the same size and to the number of panels needed. 

Based on the color scheme of your papers, you might want to paint the edges of the foam board.  I wanted them to look like shadows, so I painted all the edges of my foam panels black.


Once the paint is dry, use the glue stick to attach the paper to the panels. 

I used black poster board as my background, so I cut it to 16" x 20" and put it in the frame.  You could also paint the cardboard that comes with the frame to get the right background color.


Now all you have to do is hot glue the panels onto the background and hang it up.  Super easy right?

Monday, September 27, 2010

Fast & Frugal tote bag


A great tutorial from Daisha
Here is an extremely easy Placemat Tote Bag Tutorial for you. This is such a cute, cheap, simple and frugal way to make a new bag to take with you to the kids soccer games, the park, or to church. The possibilities for colors and fabrics are endless.
Here's what you need:

- 2 Placemats
- 1 spool of ribbon
- Thread
- A few pins
- Sewing Machine
That's it. I got all my supplies at Walmart. The placemats where  $1 each and the ribbon $2.97 - only $5.00 for a new fun homemade bag!
Here's what you do:
1. Cut off a few inches ( I took off 3) from the length of your placemats.


2. Fold under 1/4 inch than another 1/4-1/2 inch so all those frayed ends are tucked inside. Then sew to hem and secure. This will be the top edge of your bag. (Make sure your thread matches your bag here.)


3. Cut your spool of ribbon in half. Lay the ribbon out from the bottom of the placemat up and around to make the handle for each mat. To ensure your ribbons are going to match up measure 3-3.5 inches from the outer edge on both sides. Pin the ribbon in place.

Once pinned lay the two placemats with right sides together and check to make sure that the ribbons line up correctly at the bottom, so once you  complete the project everything will be lined up and matching.
4.  Carefully sew the ribbon on to each placemat sewing very close to the edge on each side of the ribbon.

5. Put the placemats right sides together. Line up the bottom ribbons and pin the two sides and bottom. Sew the edges together  about 1/4 inch from the edge.


6. To square off the bottom you need to pull the sides of the bag away from each other. Then you will grab one corner and squish the bottom and side seams together until they line up. Just feel with your hand to make sure the seams line up and pin in place. (I hope that explains it well enough:) I used pics from another bag I made because they were easier to see. Let me know if you have questions.)
7.  Sew about 2 inches in from the "triangle tip". Repeat on the other side.
8. Turn your bag inside out and admire your work!! 

TA-DA!