Friday, October 29, 2010

Paper Flowers with tute!

I loved this project tutorial and it's endless possibilities, so I gave it a test run...the results are something I can actually show off! This is really simple to do, and pretty fun, and something your children can help with...

As always, a super big thanks to Nicole at madebynicole.blogspot.com for her awesome tute.

This is so easy it feels almost silly to make a tutorial on it but just in case you aren't familiar with the technique, here goes:
(My comments and notes will show in parenthesis)
1. Get ten pieces of thin (not card stock) two sided paper - anything from newspaper to fancy patterned paper works. I used book pages
(I used book pages as well-mine had pictures...lol)


2. Stack them up and cut out a circle.
(I used a 2 1/2" paper punch-too lazy to cut circle's, and my free form circles usually look more like eggs) 
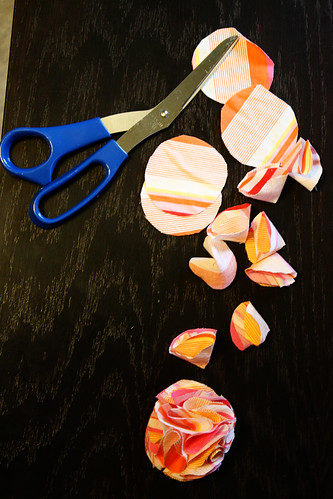
(my circles)


3. Cut spokes into the paper. I made this pic big so you can see what I mean.

4. When you're done it should look like this

(My spokes were not great, but they worked!)

5. Separate you circles. This step is vital as it won't fluff if they're stuck together
(My pile of petals)


6. Re-stack pile

7. Staple through the center of the stack

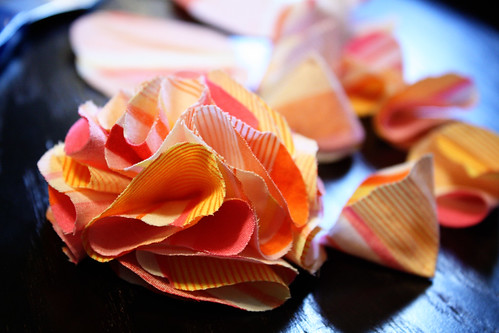
When you're done it should look like this:

8. Don't panic. I want you take your nice little stack and crumple it in your fist. Trust me, it'll be okay.

(My fat little hand crushing away)

9. Now do it again a few times

(This isn't too hard...)

10. Voila! You did it! Told you it was easy!

11. But we're not done yet. Find the back of the staple. You might lose some petals doing this - no biggie.

12. Press the back of the staple side down against your table to make a flat bottom
 
(As you can see, Nicole's tutorial is fabulous. I followed her directions and took the same types of photo's and by dang it worked!!)


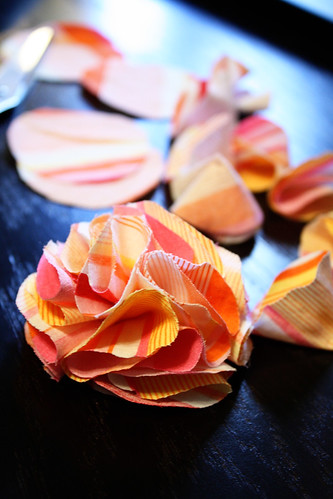
(This is my flower, with a button placed in the center. It's not completed because I still need to add the thread to the button, but you get the drift, right?)

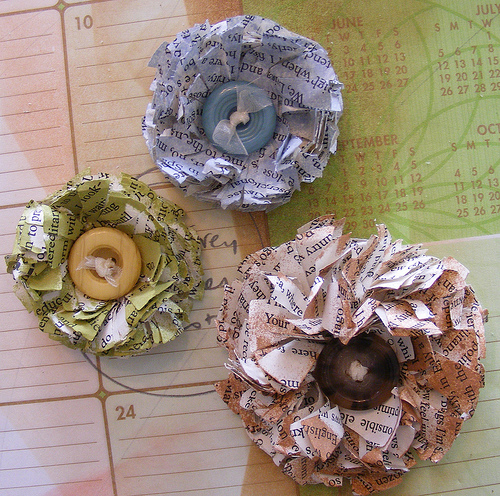
HERE IS A PHOTO WITH SOME OF THE FLOWERS NICOLE HAS MADE...BE SURE TO CHECK OUT HER BLOG POST FOR INSTRUCTIONS ON HOW TO COLOR YOUR FLOWERS, AND GREAT IDEA'S AND USE'S FOR THESE ADORABLE FLOWERS!!!

Tuesday, October 26, 2010

Book Wreath

When I found this post at JUST DROPS IN THE BUCKET I knew I had to do this! I LOVE books and reading, so this a perfect item that reflects one of the things I hold dear! I will be making one of these in the next day or so and will post pictures of my results. Until then, take a look at Dani's tutorial, it's so simple to follow and very easy on the pocket book too!  I know your going to want one of these!
The Second Life of a Book: Wreath


Thanks Dani!

Monday, October 25, 2010

Flower Pom Poms

 I have found another awesome DIY flower tutorial! There are several excellent versions of this flower floating around the blogosphere (including a different post I have here on this blog), but this is so simple and straight forward, and the pictures are excellent! We have 
to thank for this awesome post!


Pom pom 4

I've been seeing these cute flowers all over blogland/DIYland/Etsy lately. They're so fun and full, and I was dying to find out how to make them!
Then I stumbled upon the Pom Pom Flower Tutorial at A Glimpse Inside, and I could hardly wait to make one myself!
The best part of these flowers is that they are the perfect use for scrap fabric! You just need a long strip, that's all! I highly recommend you hop over to A Glimpse Inside for the full step-by-step instructions.


Pom pom 1
Pom pom 2


See? Yay for easy and fabulous!

Sunday, October 24, 2010

Strong Women


I LOVE THESE PASSAGES FROM THE WORKS OF L. FRANK BAUM...
This is absolutely true and funny!
For all of the strong, wonderful, creative, intelligent, hard working, self sacrificing, dedicated, loving, compassionate women in our world, THIS POST IS DEDICATED TO YOU! 


"As they passed the rows of houses they saw through the open doors that men were sweeping and dusting and washing dishes, while the women sat around in groups, gossiping and laughing.

What has happened?' the Scarecrow asked a sad-looking man with a bushy beard, who wore an apron and was wheeling a baby carriage along the sidewalk. 

Why, we've had a revolution, your Majesty -- as you ought to know very well,' replied the man; 'and since you went away the women have been running things to suit themselves. I'm glad you have decided to come back and restore order, for doing housework and minding the children is wearing out the strength of every man in the Emerald City.'

Hm!' said the Scarecrow, thoughtfully. 'If it is such hard work as you say, how did the women manage it so easily?'

I really do not know,' replied the man, with a deep sigh. 'Perhaps the women are made of cast-iron."
L. Frank Baum
Of course I have to admit I am also a HUGE FAN of the Wizard of Oz movie, and this post would not be complete for me without a homage to Margaret Hamilton...


Margaret is a personal role model of mine (LOL), I love her wickedness!  Can't you just hear the music? Da da da da da....
(these pictures were posted strictly for my own pleasure, plus it's Halloween time, right?).
This is me...dressed like Margaret...again...

Monday, October 18, 2010

Fire Flowers!

Jamielyn at I heart naptime is so talented. I absolutely loved this fast and fabulous flower tutorial.  She has made some darling clothing and accessories just by adding this fabulous flowers! These FIRE FLOWERS definitely belong on our FLOWER POWER list!  Click on the link below to see how she created these fab flowers!  Thanks Jamielyn!


This is another project JamieLyn created using the same how-to...
Photobucket

Saturday, October 16, 2010

Fabulous Halloween Silhouettes

Sometimes, late at night, after I been blog hopping for hours (though it seems like just a few minutes), I discover hidden treasure! I am in love with this super smart and creative craft! I LOVE the possibilities Tammy the adorable author of She Wears Flowers has inspired in me, but what I want more than anything right now is to steal her creation!

I'M LOVIN' IT! ( I sound like a McDonald's commercial ;)

I've had this one in my mind for a while now.
I had no idea how much I was going to love it when it was done, though!


Last year, I made a bunch of these.(I found this idea HERE.)

I love, love, love silhouettes and have forever so this totally worked for me. I wanted more, though - more, more, more silhouettes. This year's idea just sprung up from last year's Halloween project. I love it when that happens!

Materials:Halloween Canvas1
9 mini canvasses – 3 inches square
11 3/4 square board (1/4 inch thick)
black paint
newspaper
Mod Podge
9 silhouettes (just do a Google search--there are tons!
sponge brushes
hot glue gun
ribbon

Instructions:
{1} Cut several 3 inch long strips of newspaper. Cut 18 strips that are 3 inches x 1 inch.  Halloween Canvas2
{2} Paint the board black. Be sure to cover the edges and one side completely. I used “hardboard” for this. It is a really cheap board and works perfectly for this project. Halloween Canvas8
{3} Use Mod Podge to glue the small strips of newspaper to one side of the canvas. It should cover the edge and wrap around the top of the canvas.Halloween Canvas3
If the edge of the newspaper is just a little longer than the canvas, you can gently fold it in and glue it down. This works really well since the Mod Podge gets the paper “wet” and the newspaper is so thin. It will look something like this:
Halloween Canvas5
Repeat on the opposite side. I didn’t worry about which direction the printing was facing, but you can match it if you want to.
Halloween Canvas4
{4} Take the long 3 inch strips of newspaper and wrap them around the canvas from the top edge to the bottom edge covering the rest of the canvas. I just left the newspaper a little longer than both edges and glued it to the wood on the back after I trimmed it closer to the actual size.
Halloween Canvas6
{5}  Adhere silhouettes to each canvas. I used my Silhouette paper cutter to cut vinyl for this, but I know another way to do this using your printer and no cutting.

I used to get so frustrated when people did projects with a paper/vinyl cutter because I didn't have one and I don't live in a place where vinyl products are easily accessible. So, I learned a whole bunch of tricks. Stick with me, I've got you covered!

If you do not have access to a cutting machine, you can print the silhouettes on vellum paper. Cut around the shape in a 3 inch square very precisely. You can Mod Podge the vellum right to the newsprint. The newsprint will look a little frosted when you use vellum, but it doesn’t take away from the project in any way! You can Mod Podge over the printing, but be sure your printer ink is very dry before you do this.
Halloween Canvas7
{6} Mod Podge over the entire thing and let dry completely. Add another coat of Mod Podge if you would like. (I always do—it just seems to work better!)

{7} Use a pencil to lightly mark where you will glue each canvas. You will place them with about 1/2 inch (a little less) between each canvas and 5/8 inch around the whole thing (like a margin). I marked where I would place each corner so I could line the whole thing up. It doesn’t show up in a picture so you’ll just have to understand what I am explaining! You could also set your center piece and line up from there just eyeballing the whole thing.

{8} Hot glue (if you want it quick like I always do) your canvasses in place. If you are worried about lining it up before the glue dries, try another glue. My other favorite glue is E-6000. Wood glue would work fine since you are gluing wood to wood and I bet Elmer’s glue would work perfectly, too. This is easy!

 I love the statement this piece makes with the stark colors and the "grunge" of the newsprint.


If you would like to soften it up just a bit, add a fluffy ribbon.


You could also add a picture hanger to the back or a ribbon to hang it with.
 I like the way it looks just sitting on a table easel. I'm pretty simple!
Thanks Tammy for allowing us to share your fabulous tutorial!